Monday, January 16, 2012

Using brushwood for fertility

To a large extent natural gardening depends upon the accumulation of biomass to increase fertility. You use nitrogen fixing plants to accumulate nitrogen and any fast growing plants to accumulate organic matter. Any area of the garden you don’t need for growing specific plants can be used to grow biomass. Sometimes this might mean planting suitable species, but it’s usually easier to simply allow native wild plants to grow themselves. You then cut (actually coppice) these periodically to provide biomass and to stimulate the plants to create more. Once you have cut the plants you have to decide how best to use all of the woody material thus created to benefit the garden.

The conventional way to deal with woody material it is to burn it. This is quick and fairly easy, but of course it destroys all of the organic matter that has been created and dissipates the nitrogen (it also creates air pollution). By doing this you defeat the whole purpose of growing biomass. All you are left with a small pile of concentrated plant nutrients (wood ash), which is great fertilizer, but nowhere near as valuable as what you vaporized.

f you have plenty of space another way to deal with woody material is to stack it into a pile and leave it for a few years to decompose naturally. However this takes a long time because brush is fairly resistant to decay. You need constant moisture for wood to decay and brushwood dries out rapidly when exposed to the air. You can speed up the decomposition markedly by creating a hugelkultur bed, whereby the brush pile is covered in a layer of soil, which keeps it moist all the time (a layer of nitrogen rich manure will further speed up the process). You can also make a berm of brush, covered with soil, to vary the garden topography.

Probably the best way to use brushwood is to run it though a chipper to turn it into mulch. All naturally inclined gardeners know that mulch is a very valuable garden material, which suppresses weeds, conserves soil moisture, protects the soil from the elements and provides nutrients as it decays. The problem with converting your brush into wood chips is that you need a chipper to do so, which usually means the expense of renting a big, smelly, noisy, highly polluting, dangerous (on more than one occasion the operator has simply disappeared, leaving the machine running), gas powered machine that isn’t much fun to use after the first 10 minutes. Electric chippers make much more sense as they are much lower maintenance, quieter (I didn’t say quiet), cleaner and easier to us. Unfortunately they tend to be underpowered and most people try them out a couple of times, decide they don’t really work and give up on them. I bought a small Lescha electric chipper for almost nothing at a tag sale (no doubt the original purchaser had done this) and after trying it I gave up on it for a long time. It sat around my shed for close to 10 years before my style of gardening changed and I discovered an effective use for it.


Before 


1 hr later

No one in their right mind would attempt to chip woody brush with such a small machine as mine but that’s exactly what I do. Obviously it won’t chip a 3” branch (it wouldn’t even fit into the machine) so I trim the larger branches and separate out the smaller stuff for chipping. The neatly trimmed large stuff that remains is then used for fencing, rustic trellis, plant stakes and sticks to throw for the dog. It could also be used for the hugelkultur beds mentioned above, or even firewood. All of the smaller stuff (1” and less) goes into the chipper. Getting it through the machine requires a considerable amount of finesse though, as it’s easy to jam it, or stall and blow the circuit breaker. It took me a while to work out the proper approach, but with some persistence I eventually found that by feeding slowly, so as not to slow the motor too much, I could get it to work pretty well.

Once you get the woody biomass plants under control you can start harvesting them regularly (ideally when they are around 1” in diameter and can then go directly into the chipper) for use in increasing fertility.

Sunday, January 15, 2012

My garden wish list

As you work on your garden you will inevitably develop a list of things you want to include, for your own convenience or comfort, for efficiency, to increase productivity or simply to make the garden more interesting. Here are a few of the things on my wish list (not necessarily in order or preference).

Greenhouse
This has to be my top choice, in fact it’s not really a wish because I make sure it comes true. It expands the range of gardening possibilities in so many ways. It enables you to overwinter tender plants, you can grow transplants for your vegetable garden, propagate trees and perennial food plants, grow salad greens (or even actual crops) in winter and gives you a place to dry seeds and other stuff in summer. It also gives you a nice place to work or sit when it’s cold outside, which is really nice.

Pond
A pond is a beautiful focal point for the garden and I often find myself sitting and watching it (it’s like garden TV and can often be a distraction). It also increases biodiversity by being a magnet for wildlife (bees, birds, frogs, insects) and allowing you to grow a whole range of low maintenance (well at least they never need watering) aquatic plants. A suprising number of these plants are also edible and many are cultivated as food crops in Asia (they can also be a source of biomass for mulch or compost material.

Fruit bearing arbor
This is beautiful and adds a whole new dimension to the garden. If located close to the house it also provides a comfortable place to sit on hot days and will become a primary sitting area. At the same time if you select the plants carefully it will be a low maintenance source of delicious fruit (even if it is high maintenance it would still be very worthwhile).

Attractive fences
When you first start the garden you will often start by encircling it with an inexpensive fence. After a while you might want to replace some of the more visible parts with something more visually attractive (fences are a major focal point).

Shed
A shed is almost an essential for storing stuff, not only to keep it all safe, out of the weather and in one place, but also to stop it cluttering up other areas of the garden. A shed should be attractive as it is a very important focal point. If it isn’t then you should disguise it with plants, paint, new siding, or just by leaning attractive stuff against it!

Vegetable garden
This is pretty much the center of my garden, the place where I spend most of my gardening time and where I grow most of the food. It should be attractive and comfortable (have a nice shaded seating area to relax, think and drink tea).

Forest garden
I have quite a big garden and I find the best way to productively fill up areas not needed for anything else (but not left wild) is to plant them as forest garden.

Bush fruit garden
The bush fruit (blackberries, blackcurrants, raspberries, blueberries) are some of the most nutritious, tasty and productive plants you can grow and are some of my favorite plants. I grow a lot in the forest garden areas, but I also have an area for growing those bush fruit that birds won’t leave alone. By concentrating them in a small area they are easier to protect with netting.

Rainwater collection
Even though we may go for 6 months during the summer without a drop of rain, we actually have abundant rainfall here. It just happens to pour down in the other 6 months. The simplest way to use this is to allow it to percolate into the soil and then pump it back out of a well (and use deep rooted plants that can tap into it directly). I would love to collect the water directly from my rooftops, but this would require very large capacity storage and as yet I haven’t found an inexpensive way to do it (if you know of one let me know).

Drip irrigation
In our dry climate watering is essential if you want to grow much through the summer. If you have a large garden this can take up a lot of time and is especially difficult if you have to go away for any length of time. The solution to this problem is a drip irrigation system and a timer, which makes watering essentially automatic. This doesn’t mean you can then forget about watering though, you must still keep a careful eye on your garden.

Artwork and ornamentation
This personalizes your garden and makes it unique to you. It can be anything from your own artwork, to stuff you find, beg or (god forbid) buy. It’s a strange phenomenon but almost anything you put out in the garden looks better there than anywhere else.

Gate
The front entrance gate should look good because it is an important transition point and gives people the first impression of your garden. I not only want an attractive gate but also an overhead trellis covered in attractive, vigorous and productive climbing plants. In my last garden I grew Hops around the gate, but I’m planning to try hardy kiwi this time.

Saturday, January 14, 2012

Nitrogen fixing shrubs

Nitrogen fixing shubs are a basic element in forest gardening, as they provide a way to maintain (or increase) fertility without buying or importing anything. This makes so much sense that I think every gardener should use them and not just in a forest garden. The idea is simple enough, you just plant them in any unused patch of ground and leave them to take care of themselves. They will produce an annual crop of nitrogen rich leaves which can be used for mulch or compost material. You can also prune or coppice the plants periodically and chip the branches for mulch or compost. The nitrogen also finds its way into the soil through root sloughing and mycorrhizal fungi

While planting nitrogen fixers is certainly worthwhile, it may not actually be necessary. Before you go out and buy some of these valuable plants, you should look at what is already growing on your site. Useful wild nitrogen fixing shrubs (and trees that can be coppiced to grow as shrubs) can be found in the Alnus (Alder), Betula (Birch), Ceanothus, Cercidium (Paloverde),Cytisus, Eleagnus, Lupinus, Myrica, Robinia and Shepherdia families (they aren’t all confined to the bean family either). Some of these may well be growing there already and you don’t want to be in the absurd position of removing large and vigorous native nitrogen fixers, so you can plants some spindly little exotic nitrogen fixing shrubs you just paid for!

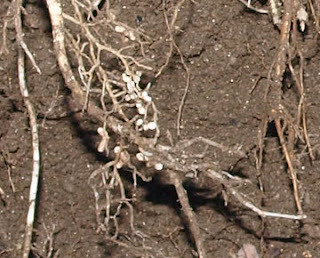
One of the problems with too much theoretical paper gardening is that it can take you away from the real garden, so you miss seeing the wood because of all the trees. I know this from experience in my own garden. I read about the importance of adding nitrogen fixers and even bought and planted some Black Locust and Siberian Pea shrub, before I really looked at everything that was already growing there. One common shrub (the particularly spiny and vigorous Coast Whitethorn (Ceanothus incanus) only attracted my attention because it would stab me every time I tried to interfere with it. In theory I knew Ceanothus species are nitrogen fixers, but this only came home to me when I had to dig one up and noticed the nitrogen fixing nodules on its’ roots. This transformed my relationship to the plant and I started to treat it as a legitimate member of my garden. This also brought home that we should take care of the native plants in our gardens and leave them alone where possible. A good rule is to never remove any native plant until you have identified it and determined its value.

Not too impressive as pictures, but here are those root nodules

Another useful nitrogen fixer in my garden is the exotic and invasive Scotch Broom. This is a serious weed in our area (in some places it’s everywhere) and for a long time I would methodically and meticulously uproot any seedlings that I saw in my garden. Even while I was trying to kill this plant, I couldn’t help being impressed by its’ tenacity. It has an astonishing ability to grow rapidly on poor soils and stay green through the heat and drought of summer with no apparent source of water at all. This winning combination of fast growth, drought tolerance and nitrogen fixing ability eventually made me re-evaluate the plant and decide that maybe nature was trying to tell me something. Instead of abusing it I started to use it as a source of compost or mulch material (it has the size, shape and density to go through my small electric shredder without any difficulty). I am still careful to keep it under strict control, so it doesn’t spread anywhere else.

Wednesday, January 11, 2012

My new greenhouse

If you live in an area with any kind of winter a greenhouse really expands the range of possibilities by increasing productivity and making gardening more comfortable and interesting. I first worked in a greenhouse over 20 years ago and quickly learned to appreciate their convenience and comfort. This inspired me to build my own greenhouse at the first opportunity and I have never looked back. Now I would find it very hard to live without a greenhouse and so every time I move I have to get creative and build another one. Over the years I’ve created quite a variety of styles: a couple of salvaged wood and polyethylene lean-tos (against the house), a couple of PVC hoop houses, a lean-to against a garden shed (made from salvaged cast iron window frames) and most recently a gable roof greenhouse I built using some single sheet polycarbonate glazing (I salvaged these from a commercially made plastic greenhouse that blew away when I neglected to weight it down sufficiently). All of these have worked well enough, but they weren’t very energy efficient. They didn’t retain much warmth on cold winter nights (they would all freeze on the coldest winter nights) and didn’t get warm enough for starting warm weather crops until March. My garden wish list has always included a solar greenhouse, which would retain enough solar heat to get early warm weather crops, and just recently I finally worked my way down to it. Building the greenhouse is a logical early winter project because you can use it immediately and for the rest of the winter, so I decided to build a solar greenhouse.

When I use the term solar greenhouse I feel I should qualify it by adding that all greenhouses are solar to some degree, but I use the term to mean one that receives and stores enough heat from the sun that it doesn’t require any supplemental heating. To achieve this the walls and roof that don’t face the sun are solid and insulated. This means some loss of reflected light, but this is more than made up for by the increased ability to retain heat overnight. There is also some thermal mass (usually 55 gallon drums filled with water) to absorb heat during the day and release it at night, which evens out the temperature.

I already had all of the lumber I needed to frame the greenhouse (in fact building it helped to clean up my garden), so my only significant expense was for the glazing (I only have roofing paper on the roof as yet). After some searching I found a local source for double wall polycarbonate glazing panels at a fairly reasonable price (at least I think it was reasonable - $65.00 for a 4x8 sheet, or $360 for five sheets). Polycarbonate is a fairly unpleasant kind of plastic and its manufacture involves some toxicity, but it is such a perfectly suited and durable material that I think its use can be justified for this purpose.

The climate here is fairly mild and for economy I didn’t make my greenhouse as energy efficient as I would if I lived in a colder area. I made the walls out of 2x4’s (rather than thicker 2x6’s which would have allowed for more insulation), I didn’t pour an insulated concrete foundation and I haven’t added insulation to the walls, or water barrels for thermal mass as yet. I’m trying to create an efficient greenhouse as cheaply as possible and plan to see how well it works as it is (I will add more energy efficiency if needed). My aim is to have a greenhouse that is warm enough to start warm weather crops in February (and maybe get a banana plant to fruit here).

Design
Before I started building I searched online and checked out various books for inspiration, but didn’t find quite what I was looking for, so I ended up designing it myself. I had some definite design criteria in mind when I started. I wanted a single flat front for simplicity of construction and wanted to use whole 8ft panels without any cutting or waste. I wanted to be able to cut the side panels from a single sheet, cut diagonally to produce 2 identical pieces (an unforeseen problem is that polycarbonate sheets only have UV resistance on one side, and by cutting it in half I got two identical left side pieces. This meant I had to cut the right hand side from another sheet to get the UV resistant coating on the outside. I also needed a fairly steep front to get enough headroom close to the front. Another important criteria was that I wanted the whole greenhouse to be movable (if I move again I want the option of taking it with me). I built it in sections that could be easily moved by two people and simply screwed together. I also wanted it to be inexpensive, so I used Douglas fir framing lumber for the greenhouse with pressure treated bottom plates where it is most likely to rot.

Building the greenhouse
I’ve been building stuff for years so this was pretty straightforward. It would have been a lot quicker to build each section completely on the ground and then simply assemble it all at the end. This wasn’t really possible because I did a lot of the design while actually building (I would come upon an unforeseen problem and have to find a solution). Instead I half built it on the ground and then moved it and did the rest of the work on site.

The finished greenhouse
The greenhouse is now close enough to finished that I’ve given it a coat of primer and have built benches around the inside. So far I’ve been very happy with the design, it actually meets all of the criteria I had and I’m now getting a feel for how it works (though I’ve already thought of improvements for next time). At the moment the sun is pretty low in the sky and it’s only getting about 5 hours of direct sun a day, which is enough to get it up into the 90’s F. My next step will be to add thermal mass in the form of barrels of water along the back wall and then I’ll think about insulation.


Wednesday, January 4, 2012

Layering

I’ve just been digging up some Viburnum trilobum plants I layered last year (or was it the year before? time flies) and it reminded me that any time is a good time to do some layering (the best time is in early spring before the buds open, but that really isn’t that long now). If you don’t already know about it layering is a pretty much foolproof propagation method that works with many different plants, including many that are reluctant to root from cuttings.

Start layering by selecting a flexible dormant shoot of last years wood and bending it sharply 12 inches from the tip. This may cause some of the fibers to crack, but that’s okay because wounded areas tend to root more easily (you can also scrape some of the bark from underneath the bend - wounding isn’t essential though). You then bury the bent part of the shoot by digging a small hole, holding the stem down and putting the soil back on top to hold it down. If it tries to pull out of the ground you can use a sharpened forked stick to hold it down (this will also help to mark it). That’s it, just ensure that the soil doesn’t dry out completely and wait. An optional further step is to tie the growing tip to a stake so it grows upright (like this).


Layering is so simple and easy it’s a great introduction to plant propagation. Go out you’re your garden after you finish reading this and spend an hour or two going around burying branches. Next year you will thank me as you go around digging up all of your new plants (don’t forget to do some more). 

Tuesday, January 3, 2012

Chantarelles

I wrote this a couple of months ago and never posted it because I never quite got around to finishing it. This is somewhat ironic because we have had no rain for the whole of December and the mushrooms have all disappeared again. It’s great to be able to work in the garden day after day in a T shirt, but pretty soon we’ll be praying for rain.

Winter generally brings abundant rain to the Santa Cruz mountains and the first storms can be expected to arrive in late October on average (though around here there is no “average”). After four months of having to irrigate continuously I look forward to the first big rain to soak the soil, it means I can turn off the irrigation timer and (hopefully) put away the hoses. It marks a big turning point of the year, the transition from summer gardening back to the winter crops. The rain is also welcome for another reason (no I don’t mean snow in the Sierras and winter camping); it wakes up all of that sleepy mycelium in the woods and stimulates it to produce the fruiting bodies we know as mushrooms. Winter is mushroom season around here, with various species to be found all winter (especially down near the coast). I’m no mycologist (my obligatory copy of Mushrooms Demystified is still clean) so I stick to the more easily identified and distinctive types, such as Oyster mushroom, Porcini and Chanterelle. These add some wonderful flavors to your meals and are free of course (which always appeals to me).

The chanterelle is a favorite of mine for several reasons; it is fairly common around here, its’ distinctive color and funnel shape is easy to recognize and it is very good to eat. A feature that makes them particularly useful is that they stick around for a while. Whereas most fungi are here today and insect eaten and decaying tomorrow, chanterelles can take weeks to grow and may be edible for a month or more. They are mycorrhizal (growing in association with the roots of trees) on a variety of host trees, though in my area they are most common around live oaks. They aren’t easy to spot initially, as the young plants hide down in the duff on the forest floor and you have to really look to see a patch of orange peeking through (my daughter with her 9 year old eyes has much better luck than I do). If you see one you should focus on it for a while to imprint the sight in your brain and with luck you will then see others hiding nearby. As they grow they become more visible and in some cases they fruit so abundantly they cover the forest floor with orange patches (a couple of weeks ago someone found so many they left a whole milk crate of them at the end of my street for people to take).

Chanterelles stay in good condition for so long there is no rush to pick them (unless you have other mushroom hunters breathing down your neck). In fact it is good to leave those small half-hidden specimens so they can grow to full size and distribute some spores. You can always cover them in leaves to hide them from unwanted eyes. Of course you have to remember exactly where they are, or you may never find them again. Woods often have few distinctive features, but you can arrange some unusual signs that will catch your eye, such as sticks in the ground, or hanging from trees.

Sauteeing is one of the best ways to cook chantarelles, as it allows a lot of their water to evaporate, though they are also good baked and in soups. The flavor is fairly delicate, so don’t waste them by cooking with strong overpowering flavors.